


Table of contents
- Crash Course Overview
- Prerequisite
- What is Version Control System...?
- What is Git...?
- Get started with Git
- What is GitHub...?
- Get Started with GitHub
- Let's Git
- Creating Remote Repo
- Creating Local Repo
- Initialize Git
- Git Project Files
- Add files to the Staging Area for commit:
- Before we commit let’s see what files are staged:
- Commit Changes you made to your Git Repo:
- Way to Uncommit Changes you just made to your Git Repo:
- Ignoring Files
- Connect Remote Repo with Local Repo:
- Pushing code to GitHub
- How to Use Branches in Git
- Open-Source Tips
- Bonus Section - Important Git Commands
- In closing
Crash Course Overview
If you want to get started on learning about Git technology, you’ve come to the right place. This is a comprehensive beginner’s guide to Git.
Git and GitHub are two technologies that every developer should learn, irrespective of their field. If you're a beginner developer, you might think that these two terms mean the same thing – but they're different.
This Crash Course will help you understand what Git and version control are, the basic Git commands you need to know, how you can use its features to boost your work efficiency, and how to extend these features using GitHub.
Prerequisite
To get the most out of this article, we need the following:
- A command line interface.
- A text editor of your choice (I will be using VS Code).
- A GitHub account.
What is Version Control System...?
Version Control Systems are software tools for tracking/managing all the changes made to the source code during the project development. It keeps a record of every single change made to the code. It also allows us to turn back to the previous version of the code if any mistake is made in the current version.
Without a VCS in place, it would not be possible to monitor the development of the project.
Types of VCS
The three types of VCS are:
Local Version Control System
Local Version Control System is located in your local machine. If the local machine crashes, it would not be possible to retrieve the files, and all the information will be lost. If anything happens to a single version, all the versions made after that will be lost.
Centralized Version Control System
In the Centralized Version Control Systems, there will be a single central server that contains all the files related to the project, and many collaborators checkout files from this single server (you will only have a working copy). The problem with the Centralized Version Control Systems is if the central server crashes, almost everything related to the project will be lost.
Distributed Version Control System
In a distributed version control system, there will be one or more servers and many collaborators similar to the centralized system. But the difference is, not only do they check out the latest version, but each collaborator will have an exact copy (mirroring) of the main repository(including its entire history) on their local machines.
Each user has their own repository and a working copy. This is very useful because even if the server crashes we would not lose everything as several copies are residing in several other computers.
What is Git...?

Git is a distributed version control system designed to track changes in a project’s files. Git was released in 2005 by Linus Torvalds.
With Git, you can revert to various states of your files (like a time-traveling machine). You can also make a copy of your file, make changes to that copy, and then merge these changes to the original copy.
Real-life projects generally have multiple developers working in parallel. So they need a version control system like Git to make sure that there are no code conflicts between them.
Why you should learn and use git?
More than 87% of developers use Git as a control system. Any developer needs at least a base knowledge of Git to be successful and relevant to the market.
Most companies, big and small, use Git as a repository, including:
- Netflix
- Lyft
- Shopify
- Atlasssian
- eBay
Git Workflow
Before we start working with Git commands, it is necessary that you understand what it represents.
A repository a.k.a. repo is nothing but a collection of source code.
There are four fundamental elements in the Git Workflow.
Working Directory, Staging Area, Local Repository, and Remote Repository.
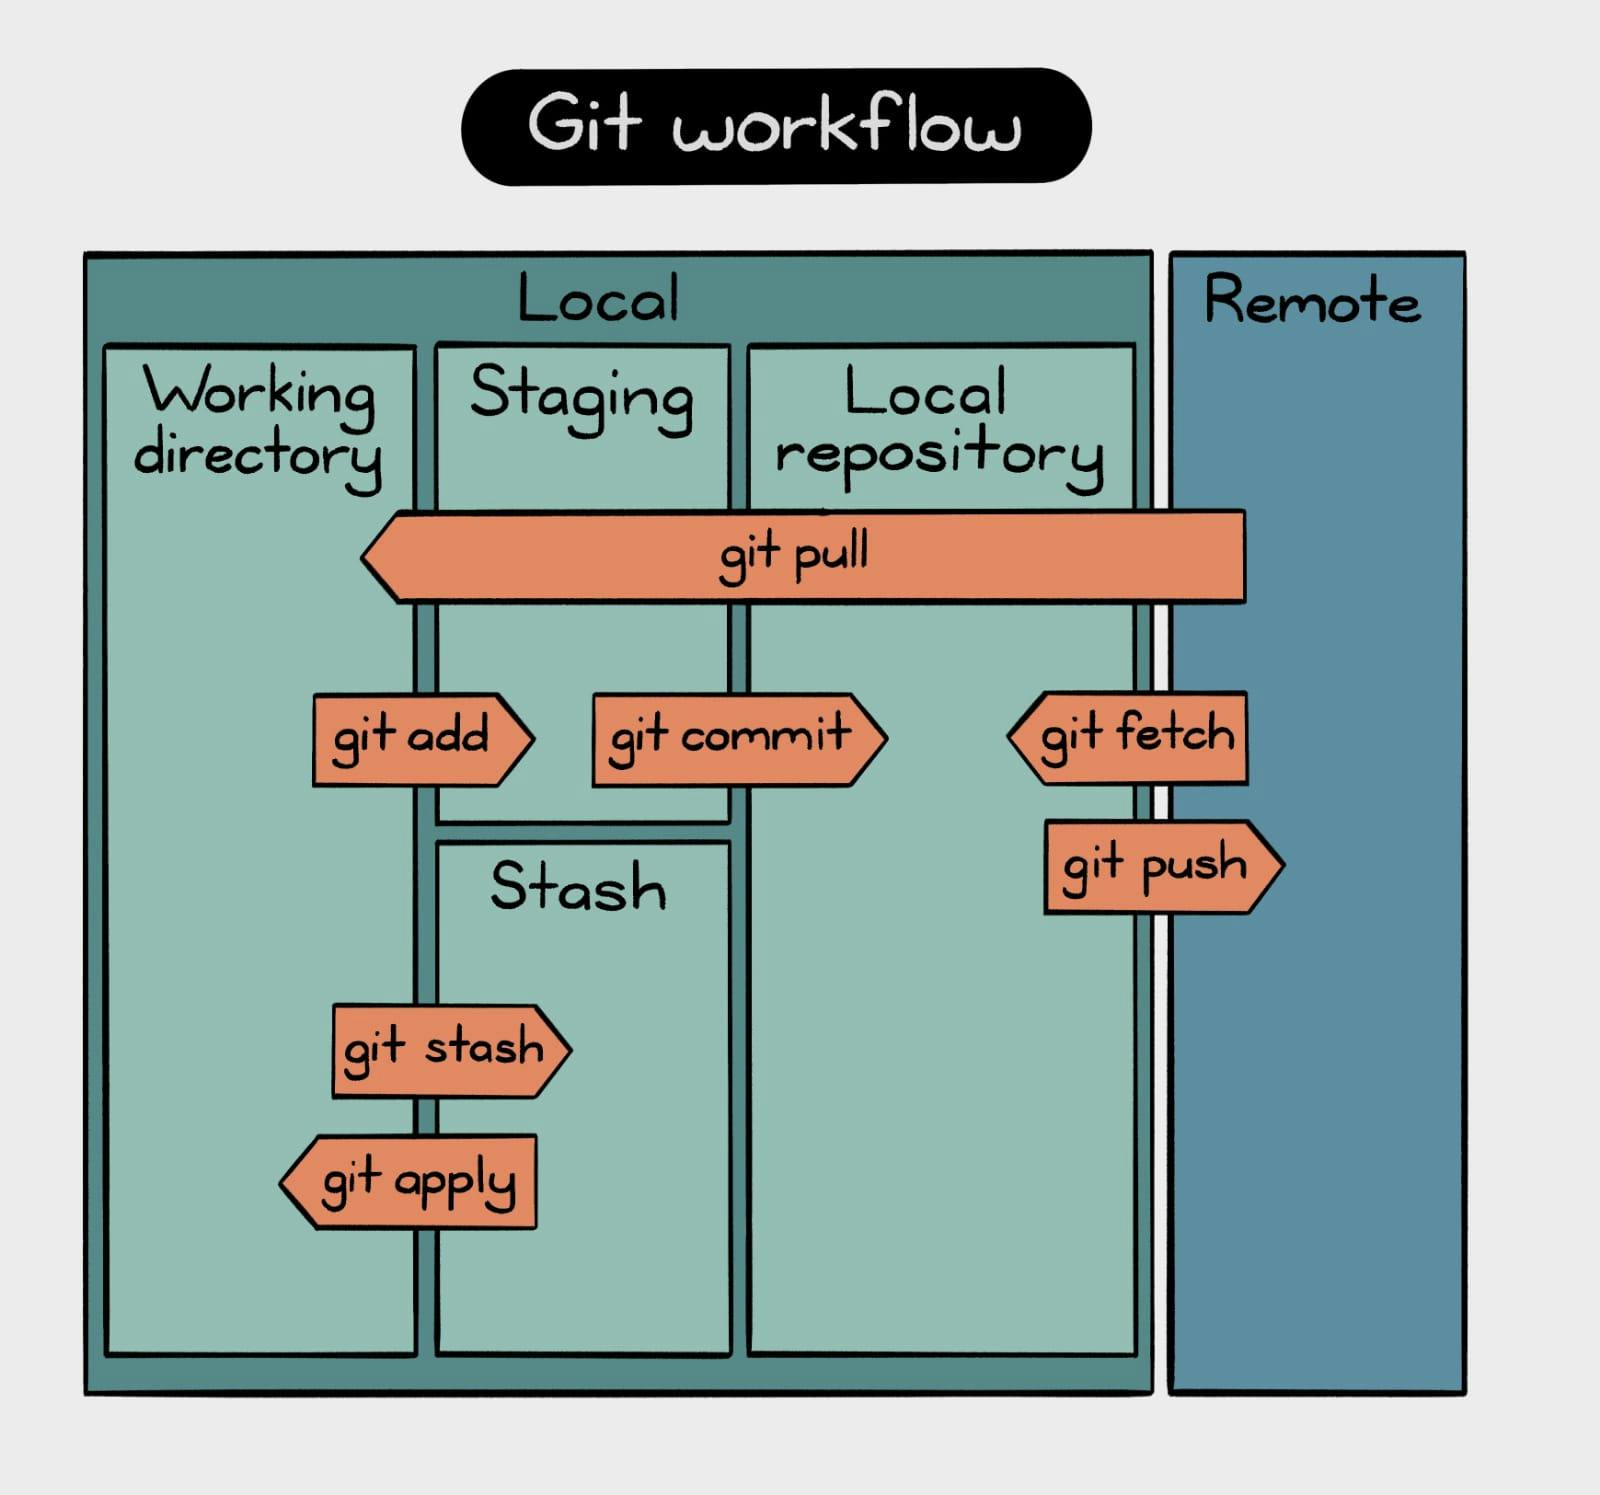
If you consider a file in your Working Directory, it can be in three possible states.
It can be staged.
This means the files with the updated changes are marked to be committed to the local repository but not yet committed.
It can be modified.
This means the files with the updated changes are not yet stored in the local repository.
It can be committed.
This means that the changes you made to your file are safely stored in the local repository.
git addis a command used to add a file that is in the working directory to the staging area.git commitis a command used to add all files that are staged to the local repository.git pushis a command used to add all committed files in the local repository to the remote repository. So in the remote repository, all files and changes will be visible to anyone with access to the remote repository.git fetchis a command used to get files from the remote repository to the local repository but not into the working directory.git mergeis a command used to get the files from the local repository into the working directory.git stashis used temporarily to store modified, tracked files in order to change branches.git pullis a command used to get files from the remote repository directly into the working directory. It is equivalent to a git fetch and a git merge.
Get started with Git
The Git software is a powerful command-line tool that you can install on your machine, whether you use Windows, macOS, or Linux.
Installing Git
If you are on a Mac, fire up the terminal and enter the following command:
$ git --versionThis will prompt open an installer if you don’t already have git. So set it up using the installer. If you have git already, it’ll just show you which version of git you have installed.
If you are running Linux(deb), enter the following in the terminal:
$ sudo apt install git-allIf you are on Windows:
$ get a mac 🙂Just kidding… Relax… The number of people I triggered… Phew… Go to this link or this official website for more info on how to get it.
First time Configuration
The
git configcommand allows you to set configuration variables that control how git looks and operates. Theconfigcommand works on different levels:Local-level: This means that all your credentials and configurations are only limited to your project’s directory. By default, git config writes to a local level when no configuration is passed.
Global-level: this configuration is specific to a user on the operating system; the configuration values live in the user’s home directory.
System-level: These configurations are placed in the system’s root path; it tracks all users and all repos on the operating system.
The first thing you configure after a successful installation is your email address and username; this will identify our contributions and changes in the project source code. To set up your user name and email, run the following in your command line:
git config --global user.name "YOUR_USERNAME"git config --global user.email "YOUR_EMAIL_ADDRESS"Git is a powerful tool, but some of the functionality is tied to having a text editor that can update settings, configure changes, or modify the contents of files. Because the defaults may not match your preferences, it’s important to specify the editor you want to use and the commands required to use it.
Personally, I enjoy using Visual Studio Code, so I use the following global default:
git config --global core.editor "code --wait"Git offers differential treatment for line endings of files, in Windows & Linux. It is important to set the proper line endings for your git repository if you need to make it cross platform. If you don’t set line endings for your git commits, then the repository code will not work when checked out on another platform.
The simplest ways to configure line endings is to us git config command. Here is an example:
For Mac
git config --global core.autocrlf inputFor Windows
git config --global core.autocrlf trueTo check the info you just provided, run the following in your command line:
$ git config --global --list
What is GitHub...?

GitHub is a platform that can be used to host code online. Think of GitHub as a platform that stores the whole codebase in a remote repository. It comes with tools to collaborate on projects of any size.
GitHub lets you store your repo on their platform. Another awesome feature that comes with GitHub is the ability to collaborate with other developers from any location.
Why you should learn and use GitHub?
Git makes it easy to contribute to open source projects
Nearly every open-source project uses GitHub to manage their projects. Using GitHub is free if your project is open source, and it includes a wiki and issue tracker that makes it easy to include more in-depth documentation and get feedback about your project.
If you want to contribute, you just fork (get a copy of) a project, make your changes, and then send the project a pull request using GitHub's web interface. This pull request is your way of telling the project you're ready for them to review your changes.
Documentation
By using GitHub, you make it easier to get excellent documentation. Their help section and guides have articles for nearly any topic related to Git that you can think of.
Integration options
GitHub can integrate with common platforms such as Amazon and Google Cloud, with services such as Code Climate to track your feedback, and can highlight syntax in over 200 different programming languages.
Track changes in your code across versions
When multiple people collaborate on a project, it’s hard to keep track of revisions — who changed what, when, and where those files are stored.
GitHub takes care of this problem by keeping track of all the changes that have been pushed to the repository.
Showcase your work
Are you a developer who wishes to attract recruiters? GitHub is the best tool you can rely on for this. Today, when searching for new recruits for their projects, most companies look at GitHub profiles. If your profile is available, you will have a higher chance of being recruited even if you are not from a great university or college.
Get Started with GitHub
To create your account, you need to go to GitHub's website and fill out the registration form.

Let's Git
Creating Remote Repo
Create a new repository on GitHub. Follow this link.
Step 1: Click on new
Step 2: Click on create repository
Give your repository a name, and description(optional), choose if you want to make it a public or a private repo(only you and the people you give access can see a private repo), and you can also add a readme and a license if you want. Otherwise, leave all that options as it is and click create repository.

✨Your repo is created
Creating Local Repo
I have created a folder on my desktop called git-and-github-tutorial. Using the command line, navigate to your new project's location. For me, I would run the following commands:
$ cd Desktop/git-and-github-tutorialIf you are new to the command line and are still learning how to use it to navigate around your PC, then I would suggest using Microsoft's Visual Studio Code. It is a code editor which has an inbuilt terminal for executing commands. You can download it here.
After installing VS Code, open your project in the editor and open a new terminal for your project. This automatically points the terminal/command line to your project's path.
Initialize Git
Git is present in your system, but it is sleeping and it'll remain asleep until you'll wake him up. To wake him up and tell him to start working on a project, you have to use a command inside that project folder in the command prompt.
To wake Git up, the command is:
$ git initRunning this command would initialize an empty Git repository in the current directory. A new subfolder named .git is created which contains several files and more subdirectories that Git will use to keep track of changes in the project.
Git Project Files
Let’s create the first file that we will be tracking using Git. Ensure you are still in the git-and-github-tutorial directory on your terminal, then run the following command:
touch sample.txtThis will create a file named sample with the .txt extension.
Open the file in your editor and add the following lines to it:
This is sample text.Save and close this file.
Add files to the Staging Area for commit:
Now to add the files to the git repository for commit:
$ git add .The above command Adds all the files in the local repository and stages them for commit
OR if you want to add a specific file like this:
$ git add sample.txtBefore we commit let’s see what files are staged:
$ git statusThe above command will list all new or modified files to be committed.
Commit Changes you made to your Git Repo:
Next, you need to make a commit with an accompanying commit message. Commit messages are short descriptive messages describing what changes were made.
Let’s commit the file that’s currently staged by running the following command: git commit -m "add sample.txt"
git commit -m "add sample.txt"This command saves a new commit with the message “add sample.txt”. Now, when you run
git status, you will get a message indicating that your working tree is clean (no modified or untracked files).Way to Uncommit Changes you just made to your Git Repo:
Now suppose you just made some error in your code or placed an unwanted file inside the repository, you can unstage the files you just added using:
  $ git reset HEAD~1
  # Remove the most recent commit
  # Commit again!
Ignoring Files
Sometimes there are untracked files that you would not like to add to your git index. These may be user-specific configuration files, like a .env file, or folders with large files, like the vendor folder for PHP projects or node_modules in JavaScript projects.
You can instruct git to ignore these files by adding glob patterns to a
.gitignorefile. This file will live in your project’s root directory and can contain any number of patterns. Any untracked file or folder that matches a pattern specified in the.gitignorefile is ignored by git.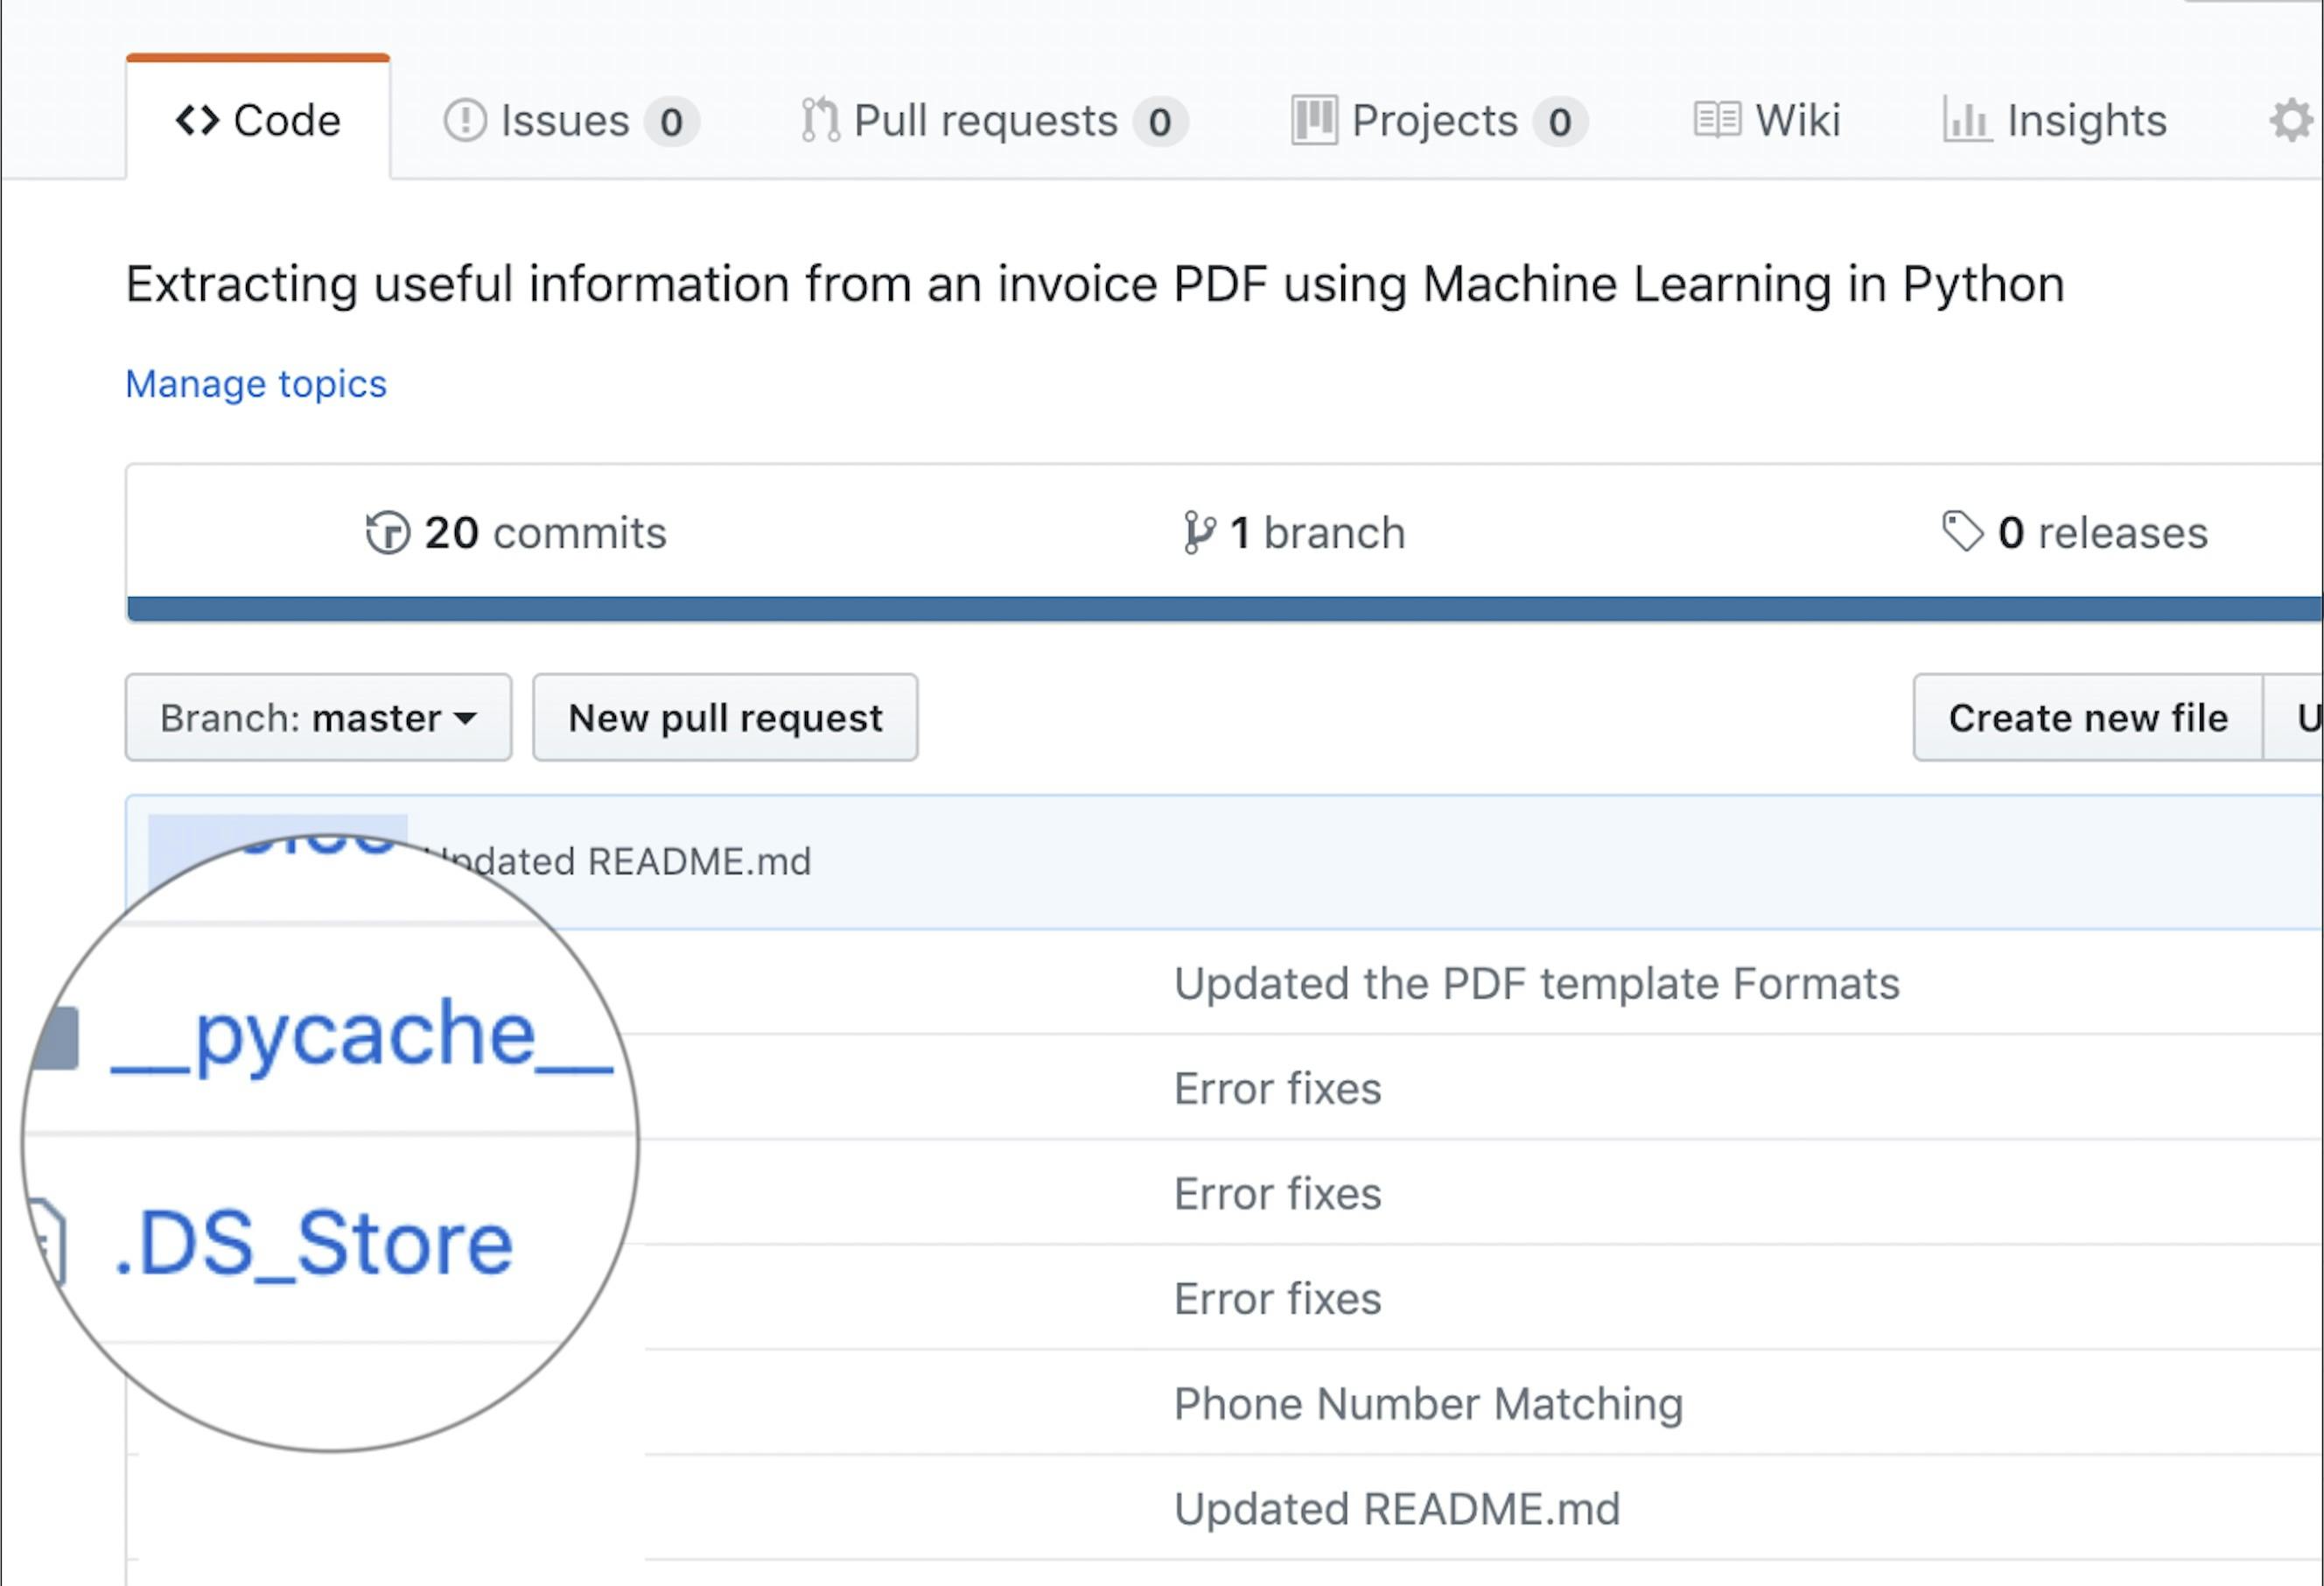
So in the above example, files like pycache, .DS_Store are used by the system to store information for faster access. This is not useful for other collaborators. So we can tell git to ignore them by adding a .gitignore file.
Use the touch command to create the .gitignore file:
$ touch .gitignoreAnd you can add the following patterns to tell git to ignore such files.
/*.cmake
/*.DS_Store
/.user
/build

# Config files
.env
.env.local
/.vscode

# Large folders
/node_modules
/vendor
Each line in a
.gitignorefile specifies a pattern. Lines that begin with a # sign are comments. The patterns here are similar to what you would typically see in a PHP or JavaScript project.The following are examples of patterns used in a
.gitignorefile:- *.env matches all files with a .env extension
- /vendor matches the folder named vendor, as well as its subfolders and files
- build_output.log would match the .log file named build_output.
Connect Remote Repo with Local Repo:
Now each time you make changes in your files and save them, they won’t be automatically updated on GitHub. All the changes we made in the file are updated in the local repository. Now to update the changes to the master:
 $ git remote add origin remote_repository_URL
 # sets the new remote
The git remote command lets you create, view, and delete connections to other repositories.
$ git remote -v
# List the remote connections you have to other repositories.
The git remote -v command lists the URLs of the remote connections you have to other repositories.
Pushing code to GitHub
Once we have added the remote repository URL to our local one, we will want to push or upload our local code and its revision history to the remote repository. This can be done using
git push.The
git pushcommand will update the remote repository code with all the updates that were made in the local repository.First, commit the
.gitignorefile we created earlier.git add . git commit -m "add .gitignore"You can run the following command to push your code to the remote repository:
git push -u origin masterAnd there you have it. You have successfully pushed your code to a remote repository.
How to Use Branches in Git
Git branching is a very powerful feature and an important one to know. We talked about Git's superpower to create identical copies of your project, and allow you to work on them separately; Git achieves this through branching.
With branches, you can create a copy of a file you would like to work on without messing up the original copy. You can either merge these changes to the original copy or just let the branch remain independent.
Before we go into using branches, I want to show you a visual representation of our repo which looks like this:
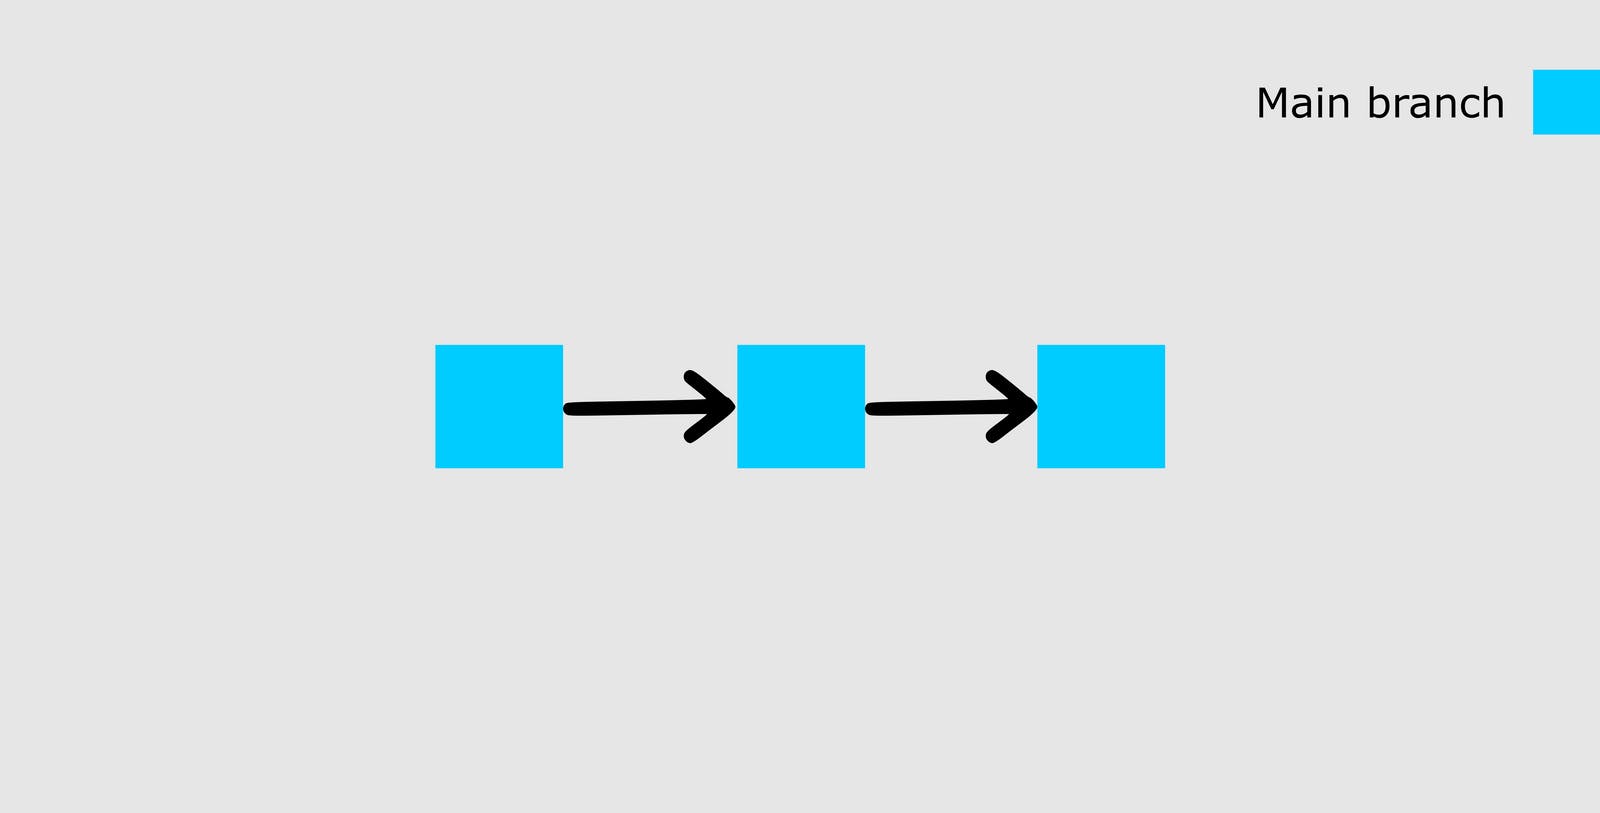
The image above shows our main branch with the last two commits (add sample.txt and the add .gitignore commit).
At this point, I want to make more changes but I am not yet sure whether I want them on main code. So I will create a new branch called test to see how would project look like with new changes.
To check branches in your project:
git branch
To create a new branch, run this command:
git checkout -b test.
I will break it down. checkout tells Git it is supposed to switch to a new branch. -b tells Git to create a new branch. test is the name of the branch to be created and switched to.
Now that we have a new branch created, this is what our repo will look like:
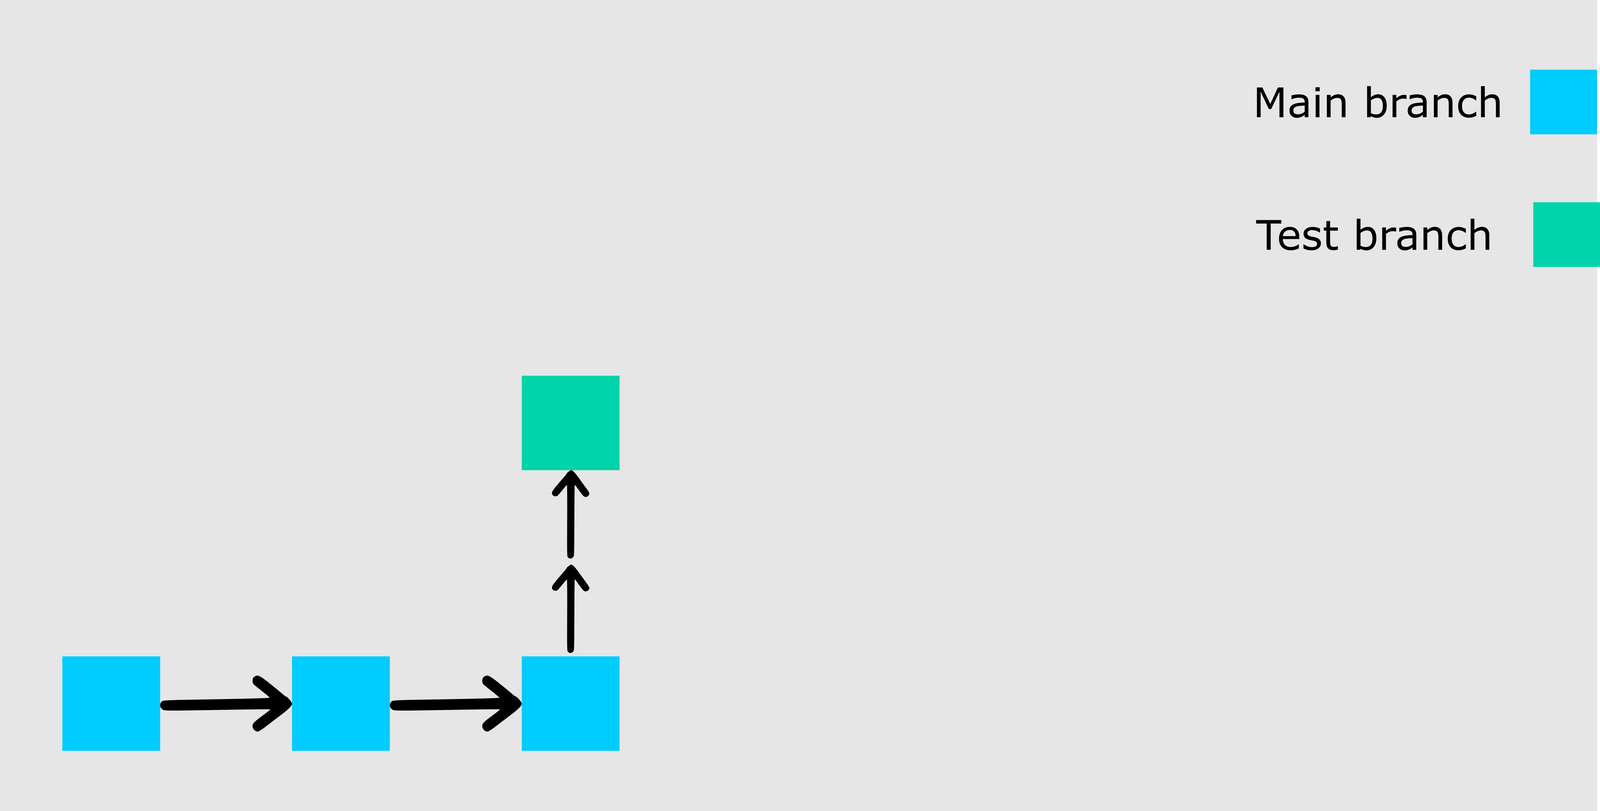
We created the new branch from the state of our last commit. Let's let's make some changes to this new branch.
  touch README.md
  git commit -am "Add README file"
To merge the new state to the main branch, you have to first stage and commit this branch. I will not go into details about how to do this as we did it twice in the last section.
You should try doing it yourself so you understand how it works. As a hint, add the file and then commit with a message (refer to the previous section for details showing you how to do that).
After committing your test branch, switch back to the main branch by running this command:
git checkout main.
Did you notice that we did not add -b ? This is because we are not creating a new branch but rather switching to an existing one.
Now we can merge the changes we made in the test branch into the main branch by running git merge test. At this point, you will see all the changes made in the test branch reflected on the main branch.
Here is a visual representation of our repo:
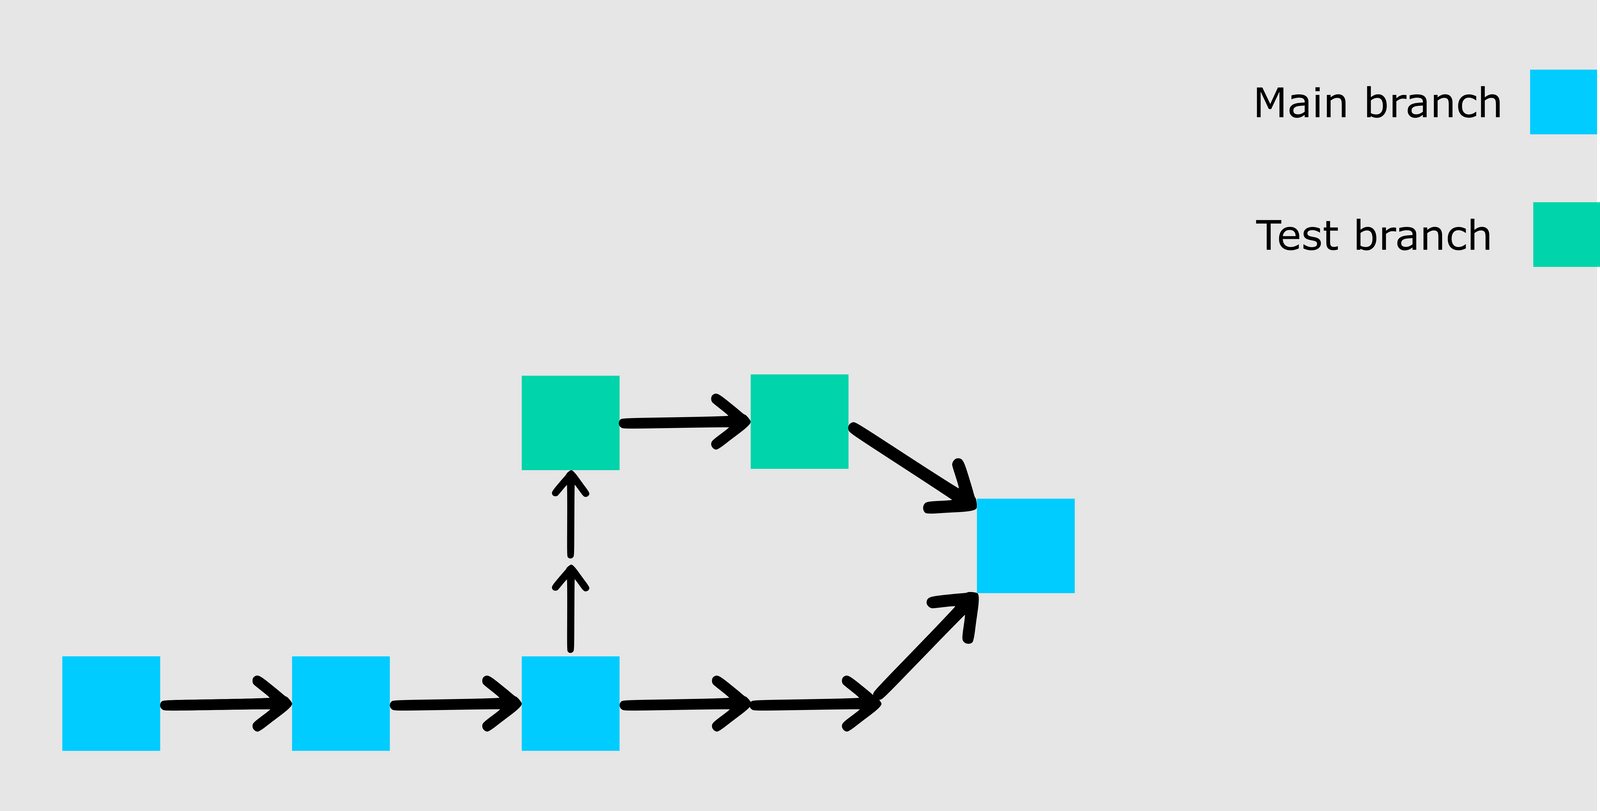
If you go on to push your repo to GitHub, you'll see that the test branch will not be pushed. It will only remain in your local repo. If you would like to push your test branch, switch to the branch using git checkout test and then run git push -u origin test.
Open-Source Tips
Always make a separate branch when you working with a new feature or fixing a bug in someone's else repository.
HEAD : It's just a pointer that means all the commits that you've made will be added on the head(the new branch).
To check when someone else commits to the main branch.
git checkout main- For merging your code with the main code.
git merge [branch-name] For copying existing organization project use
forkfor thatclone that project in your repository.
git clone [URL] (paste the URL of the forked project)upstream URL: It's the URL from where you've forked the project.
git remote add upstream [URL]To make changes in the upstream (original project)
make a new branch
git checkout -b [new-branch]For making changes in the original project of the organization we use pull request.
NOTE: One Branch for One pull request We always make a new branch to make it easier to review our commit to the original project.
Bonus Section - Important Git Commands
git init
Initializes an existing directory as Git repository (.git directory).
git init
git clone
Retrieve an entire repository from a hosted location via URL.
git clone [url]
git add
add a file to your next commit(stage).
git add [file]
git rm
Deletes the file from project and stages the removal for commit.
git rm [file]
git mv
Changes an existing file path and stages the move.
git mv [existing-path][new-path]
git commit
Commits the staged contents as a new commit snapshot.
git commit -m "your commit message goes here"
git branch
List, Create or, Delete Branches(branches looks like an acyclic graph)
- List branches
git branch - Create a new Branch at the current commit
git branch [branch-name] - Delete a Branch
git branch -d[branch-name]
git status
Shows the paths of modified files in working directory.
git status
git diff
Show changes between commits.
- to see diff of what is changed, but not staged
git diff - to see diff of what is staged, but not commited
git diff --staged - to see diff between 2 branches
git diff BranchA...BranchB
git log
Shows the commit history for the currently active branch.
git log
git checkout
Switch Branches. Switch to another branch and, check it out into your working directory .
git checkout [branch-name]Switch to another branch(create if does not exist)
git checkout -b [branch-name]
git merge
For joining two or more development histories together.
git merge [branch]
git fetch
Fetch branches and/or tags from one or more other repositories.
git fetch [alias]
You can use git fetch to know the changes done in the remote rep/branch since your last pull.
git pull
Fetch and merge any commits from the tracking of a remote branch.
git pull
git push
- For making changes in your repository
git push origin [branch-name] - Transmit local branch commits to the remote repository branch.
git push [alias]
git rebase
Applies any commits of the current branch ahead of the specified one. It is used if you need to rewrite the history of a project.
git rebase [branch-name]
git revert
Reverts some existing commits.
git revert
git reset
- If you want to delete the commits.
you can get "haschodeId" by runninggit reset [hashcodeId]git log(NOTE: the commits deleted will be in an unstaged area)
Resets current HEAD to the specified state.
Unstages a file while retaining the changes in working directory.
git reset [file](NOTE: the commits deleted will be in unstaged area)
Clears staging area, rewrites working tree from specified commit.
git reset --hard[commit]
git stash
Temporarily stores modified, tracked files in order to change branches. It's used when you don't want to commit your working files but wants to store them temporarily.
Save modified and staged changes
git stashList StackOrder of stashed file changes
git stash listWrite working from the top of the stash stack or bring your temporarily stored files.
git stash popDiscard the changes from top
git stash dropFor deleting temporary stored, modified, and tracked files.
git stash clear
git remote
For adding the URL of your repository to your project
git remote add origin [URL]Remote means you're working with URLs and origin is the name of the URL.
Shows all the URLs attached with your project
git remote -v
In closing
I hope that you’ve found this tutorial helpful...! If you have any questions or feedback, feel free to leave a comment below.
If you found this article helpful, please like and share it 💙.
That's all for today! 😁 You reached the end of the article 😍.
Other Resources
Check out some of these resources for a more in-depth look into Git and GitHub :
- Git CheetSheet
- Complete Git and GitHub Tutorial
- Git and GitHub Tutorial For Beginners
- Learn Git in 1 Hour
Want more..?
I write web development articles on my blog @akashkadlag.hashnode.dev, and also post development-related content on the following platforms: